Wednesday, September 10, 2008

Hamlin Park Adventure and Contact Sheet

Today you are going to have a majority of the period to shoot pictures in Hamlin Park. Our goal is to use the basics we have learned to take interesting and unique images.

  • what to shoot: you will be shooting 3 images of 7 different subjects/objects. Each image should be from a unique angle and all should follow the rule of thirds
  • what to do with your images: you will be importing your images and then creating a contact sheet in PhotoShop ( File > Automate >contact sheet II).
  • Things to remember:
  1. The rule of thirds: an image can be divided into nine equal parts by two equally-spaced horizontal lines and two equally-spaced vertical lines. The four points formed by the intersections of these lines can be used to align features in the image. aligning a photograph with these points creates more tension, energy and interest in the photo than simply centering the feature would.
    This photograph of a sunset taken in the Thousand Islands region demonstrates the principles of the rule of thirds
    This photograph of a sunset taken in the Thousand Islands region demonstrates the principles of the rule of thirds
  2. Shooting from unique angles: none of your 21+ images should be taken from 5'8" - 6'2". That is, squat down, stand on top of something, crouch behind something, move around to find a different and unique perspective at your subject. Anyone can stand there and take a snap shot, show us your perspective by thinking outside of that box.

  • Please turn in a contact sheet saved as YourLastName_Hamlin.jpg (using save as in Photoshop) and turn it into the classes folder on the staff server.

Thursday, May 29, 2008

Final Portfolio


This should be a collection of the absolute best and brightest images past, present, and future. Your portfolio should consist of 7 or more images. Below each picture you will also describe the composition elements used on each photo, what you did to adjust the picture, why it is in your portfolio and where you took the picture.

3 of these images may be pictures previously taken or printed for this class, though you are not required to reuse anything. The other 4+ must be new, fresh and fantastic. Each individual photo will be graded accordingly. They should all be examples of the VERY best that you can do and will be graded more stringently than any previous assignment. It is imperative you showcase your ability to shoot many angles of shots with many levels of camera composition (Review composition elements and types of shots if necessary).

A one-page reflection is also required. In this paper you need describe what you learned during your project. What did you learn about your printing, shooting, and photography in general. What was easy and difficult about your project? What would you do differently if you did it again? Which did you find more rewarding/challenging; shooting or darkroom? Finally, how far along do you think you have come as a photographer this semester?

Lastly you will need to come up with a professional way to display your portfolio; frames, mats, poster, tri fold, binder, booklets, rocket ships etc.

A link to suggestions on building a portfolio can be found here

An online portfolio of B&W prints can be found here
and here

Monday, May 5, 2008

Written Portion of My America

OK, now you have pondered what the term "America" means to you and how you can represent it on film. The next step is to explain that to me. Please answer the following questions about your photograph(s).


  • What is your "America"?
  • How does your image(s) depict this?
  • Please explain the message you are trying to show in your image.
  • Do you feel your message is clear? (i.e. would someone unfamiliar with the assignment get or understand your image/message?) why or why not.

Thursday, May 1, 2008

Choices

Please pick from one of the following categories to shoot for your next assignment. You will need to shoot an entire roll of film for the chosen topic and turn in a contact sheet and a final print.

  • Abstract -- Abstract Art is defined as: any art in which real objects in nature are represented in a way that wholly or partially neglects their true appearance and expresses it in a form of sometimes unrecognizable patterns of lines, colors and shapes. Your goal is to make the ordinary extraordinary.

  • Darkroom Manipulation: Using darkroom techniques such as the Sabbatier effect, sandwiching negatives, making paper negatives, and creative dodging and burning make a unique and creative image.

  • Sports/Action: Take a series of action pictures of the sport of your choice. Experiment with stopping action, intentionally blurring the action and panning with the action to blur the background.


Monday, April 21, 2008

My America

Ponder what the term America means to you, what emotions, thoughts, ideas, etc does it stir up? Take these and put them on film. For this assignment catch 'Your America' on your camera. Show what you like, hate, love, feel, and think about America. You need to shoot a minimum of 30 pictures by the end of the day Friday that exemplify your America. Try and think outside of the box and be creative!!!


For today please generate a list of 10 words or phrases that correlate to America for you. Then please search for these terms on Getty Images to gather ideas.

Thursday, March 27, 2008

Framing and Leading Lines

leading lines: Use leading lines to draw the viewer's eye through the photograph. This is an especially powerful technique to draw the viewer's attention to one or more intended subjects or a single focal point. A path, a row of telephone poles, or even a line of chairs at the beach can serve as elements in a good photo.

Classic Packard

Downtown Detoit, Michigan

Breakwall, East Harbor State Park, Marblehead, Ohio

Boardwalk through the Woods

Bike Trail under Bridge, Cleveland Metroparks


Child on Woodland Trail


Framing:

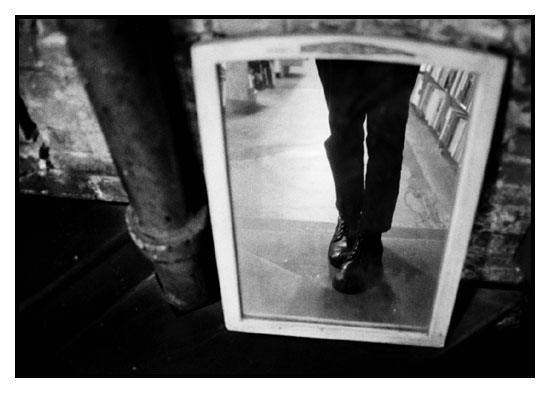
Framing is more than what you do with your prints! It is a powerful composition technique. Careful framing of your subject can make a dramatic difference in your photos. Remember—every photo has a foreground and background, so use them together to add an interesting element to the shot.

Use foreground elements to frame your photo's subject. Architectural elements work well (windows, doorways, arches, and so on), but you can find any number of interesting elements to use for framing your photos. The important point here is the subject. It doesn't do much good to frame your subject with interesting elements if they overshadow the subject, making it difficult to determine what the subject is supposed to be.

Photo of building


Assignment: Shoot a roll of film documenting your Spring Break. Use either FRAMING or LEADING LINES or both in EVERY shot! Have this roll for class on Monday April 6th.

links:

http://smccd.net/accounts/takayama/lecture/comp-pics.htm

http://www.scrapjazz.com/topics/Photography/Lessons/579.php

http://www.flickr.com/photos/aunto/386071872/

http://www.flickr.com/photos/giletti/386073756/

http://photoinf.com/General/KODAK/guidelines_for_better_photographic_composition_framing.html

Wednesday, March 19, 2008

Filters


They increase contrast and can really make your pictures POP!

Experiment and try some out on your landscapes!!!

Dodge & Burn

Here is a how to on dodging and burning:

http://scphoto.com/html/dodge_burn.html

Thursday, March 13, 2008

Portraits


Portrait Assignment

first half of roll:

1. Find an interesting human subject. The person you choose should WANT to be in the picture and they should be willing to cooperate.
2. Talk to your subject. You are the director of this adventure, make it what you want. Use colors or lighting to create a concept for your portrait. Costumes or uniforms work great. Imaginary ideas are OK. Choose an interesting setting based on your concept.
3. Change angles between shots. Shoot at least 25 pictures of your subject.
5. Change your lighting; Use filters, flashlights, lamps, or multiple lights to enhance your picture.
6. Remember you are the boss, make them change their expression. Pretend it is high fashion and they have to create the next great "look" like blue steel (Zoolander).
7. Most importantly for this assignment don't forget your composition rules. Use framing, leading lines, rule of thirds, color contrast etc. to enhance your photo. Fill the frame!!!! HAVE FUN & BE CREATIVE!!!!

second half:

Candids --

http://en.wikipedia.org/wiki/Candid_photography

Portrait Info

tips:

http://www.shutterbug.net/refreshercourse/portrait_tips/180/

http://shutterbug.com/refreshercourse/portrait_tips/204portrait/

Galleries:

Annie Leibovitz:

http://iwant.on.ca/FavPhotographers/AnnieLeibovitz.html

Charlie Schuck:

http://charlieschuck.com/ --> click on editorial

Thursday, March 6, 2008

Work Days

Tuesday (3-4), Thursday (3-6) and Tuesday (3-11) will all be work days. By the end of Tuesday the 11th you need to have a contact sheet and photograph printed for the 5 angles assignment and a full roll of film shot for the landscape assignment.

Thursday, February 28, 2008

Landscapes!!!


Photography has a couple of compositional rules we will work with this semester. First and most notable is the rule of 1/3. This states that an image can be divided into nine equal parts by two equally-spaced horizontal lines and two equally-spaced vertical lines. The four points formed by the intersections of these lines can be used to align features in the photograph. Additionally the horizon line should be placed on either the upper or lower deviding line.

For landscapes there should also be 3 prominant areas in the photograph, for/mid/background. This will add depth to your images and lead the viewer deeper into the photograph.

Your task is to shoot landscapes... lots and lots of interesting landscapes. Consider changing camera andgles, get closer, farther away, squat down, stand on something tall, and follow the rules above to find great success.

Contact Sheet


cut your negatives up and place them into a clearfile. You will use this to make a contact sheet.

place your paper under your negatives. place your negs on top and a plate of glass atop that.

follow the test strip directions:
http://www.ehow.com/how_14807_make-test-strip.html

Friday, February 22, 2008

5 Angles


This is your first film shooting assignment. It is intended to be an experiment with your camera and to be fun! The goal is to end up with some interesting and quality images. The task is to shoot a whole roll of film (24 exposures). The subject matter is entirely up to you.

5 Angles: For each "subject" shoot 5 unique and interesting images, for different and creative angles. Shoot from above, below, close up, far away, inside, with a fast or slow shutter speed, etc. DO NOT SHOOT STANDING STRAIGHT UP! Squat down, stand on top of something, get inside your subject, try and think outside of the box.

Your roll MUST be shot by the end of Monday Feb. 25th

Above are 3 examples of different perspectives of one subject... You must take 5 angles of each subject!

Composition


The rule of thirds is a compositional rule of thumb in photography and other visual arts such as painting and design.[1] The rule states that an image can be divided into nine equal parts by two equally-spaced horizontal lines and two equally-spaced vertical lines. The four points formed by the intersections of these lines can be used to align features in the photograph. Proponents of this technique claim that aligning a photograph with these points creates more tension, energy and interest in the photo than simply centering the feature would.

Photogram


A photogram is a photographic image made (without a camera) by placing objects directly onto the surface of a photo-sensitive material such as photographic paper and then exposing it to light. The result is a silhouetted image varying in darkness based on the transparency of the objects used, with areas of the paper that have not received any light appearing light and those that have appearing dark, according to the laws of photosensitivity. The image obtained is hence a negative and the effect is often quite similar to an X-Ray.

You will need to create a QUALITY and CREATIVE photogram in class on or before Feb 25th 2008.

Welcome to print photography!!!!


For this class you will need a camera (35mm film camera, preferably an SLR) and paper and film (see materials list for details). Additionally you will be required to complete an off campus permission form as you will have class time to shoot for assignments.