- contact sheet
- best print
- that print re-printed using a filter (please label which filter used on the back of the print)
Wednesday, October 27, 2010
Landscapes Due TODAY
Please turn in your:
Monday, October 25, 2010
back to basics...
Today we are going back to the beginning, we are working on composition. Your task is to review each of the compositional techniques below and then go out and shoot 1 GOOD image for each technique. These are basic practices that should be ingrained into your brain and you should consider each of these with every shot you take (for class and otherwise!).
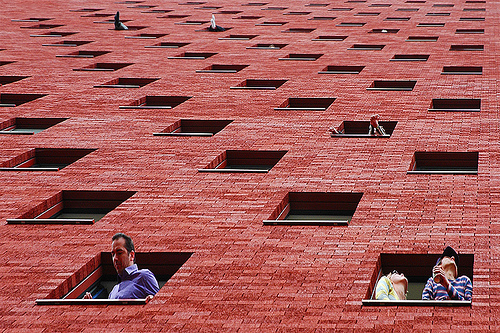
- Angles -- finding unique angles to shoot from. examples
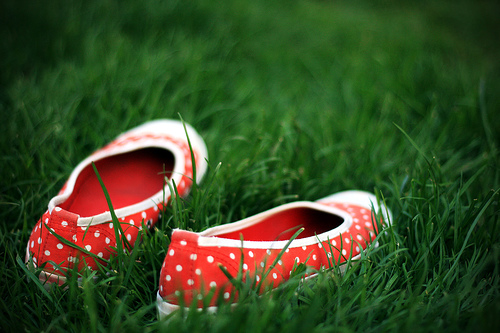
- Filling the frame -- fill your shot with interesting stuff, examples
- Framing -- create a frame withing a frame (use objects to frame in your subject). examples
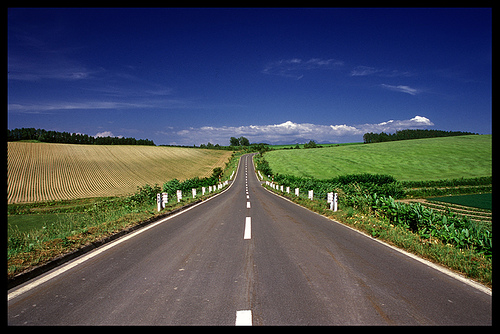
- Lines -- use lines to lead your viewer deeper into your image. examples
Friday, October 22, 2010
SUPPLIES ARE DUE MONDAY
Remember your darkroom supplies are due Monday. You MUST have some paper and film. Details on the materials list handed out two weeks ago.
FILM:
You will have to buy this at a camera shop, most drug stores do not sell true black and white film.
You will need 4 to 6 rolls of ASA/ISO 400 speed black and white film for this class. 24 exposures will be fine. I suggest:
- Illford HP5 400
- Kodak tri-x 400
- Kodak t-max 400
- Other 400 speed black and white films will be fine, we will just need to look up developing times for them
- NO C-41 FILM!!! THIS IS B&W FILM FOR COLOR PROCESSING, WE CAN NOT DEVELOP IT HERE.
PAPER:
8x10 paper has been provided for making contact sheets. You will need RC (Resin coated) photographic paper for this class (not fiber paper) to print your images. This again will need to come from a camera store, it needs to be paper for black and white darkroom use, not inkjet printers etc. Office supply stores and drug stores will not sell this. I suggest:
- Illford MGV Multicontrast RC paper
- Kodak Polycontrast RC Paper
- Others brands (arista, EFKE, Forte, etc. will work fine, we will just need to look up developing times for them
- 25+ sheets of 5x7 paper
WAYS TO SAVE:
If you buy in mass quantity you can save big! Share a larger quantity of paper with classmates to save. Also, if you order quick there are good deals to be had online and in catalogs!
WHERE TO BUY:
| GLAZERS 430 8th AVE N Seattle WA 206-624-1100 | KENMORE CAMERA 18031 67th AVE NE Kenmore 425-485-7447 |
| FREESTYLE PHOTO www.freestylephoto.biz | B&H PHOTO www.bhphotovideo.com |
| JIM’S CAMERA (used cameras) 1313 NE 43rd St. Seattle 206-547-1440 | CAMERA TECHS (repair & film) 2034 NW Market St Seattle 206-782-2433 |
| CAMERA CLINIC (cheap used cameras and repaird) 518 NE 165th St Shoreline 206-367-2440 |
|
a little research
Often this course lends itself to a hair of down time as the darkroom only fits 13 of you. Thus, our first research project is upon us!
Please choose a photographer from the list below (or elsewhere), find one you like, that interests you, and you would have fun researching and later emulating. Each student will be choosing a different photographer.
You will be writing a 1 pg paper about your chosen photog. In no LESS than one page (double spaces 12pt font) please explain:
• Who you selected and who they are (i.e. when, where, what etc)
• Describe their photography (what is unique about her/his style and technique), what do the photograph, how, why?
• Explain how he/she (or something they did, used, invented or created) has impacted or changed the world of photography.
• Why did you choose this photographer? What do you like about their work/style?
• Abbott, Berenice
• Adams, Ansel
• Adams, Robert
• Alvarez Bravo
• Arbus, Diane
• Atget, Eugene
• Bellocq, E.J.
• Blossfeldt, Karl
• Brandt, Bill
• Brassai
• Callahan, Harry
• Cameron, Julia M.
• Coburn, Alvin L.
• Cunningham,Imogen
• DeCarava, Roy
• Doisneau, Robert
• Eggleston, William
• Evans, Walker
• Friedlander, Lee
• Gutmann, John
• Hine, Lewis
• Kertesz, Andre
• Klein, William
• Koudelka, Josef
• Lange, Dorothea
• Lartigue,Jacques H.
• Laughlin,Clarence J.
• Levitt, Helen
• Mapplethorpe,Robert
• Modotti, Tina
• Muybridge,Eadweard
• Nadar, Felix
• O'Sullivan, Timothy
• Outerbridge, Paul
• Porter,Eliot
• Riis, Jacob
• Rodchenko,Alexander
• Salgado,Sebastio
• Sherman, Cindy
• Smith, W. Eugene
• Sommer, Frederick
• Steichen, Edward
• Stieglitz, Alfred
• Strand, Paul
• Talbot,William H. Fox
• Uelsmann, Jerry
• Weegeehttp://www.blogger.com/img/gl.link.gif
• Weston, Edward
• White, Minor
• Winogrand, Garry
Guy Bourdin
Cartier Bresson
Andreas Gursky
Annie Leibowitz
Monday, October 18, 2010


going digital:
First set the camera to MANUAL mode (M) on the top dial:
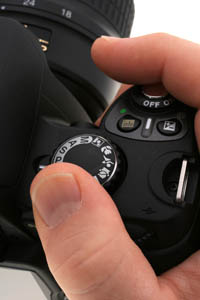
To adjust the shutter speed you will be using the thumb click wheel:

To adjust the aperture you will need to hold down the "AV" button while using the same click wheel:

Tips: try and repeat the same action (speed, focus etc).
You will be finding a different scene/object/subject. You will photograph this 3 times using a different combination of aperture and shutter settings.
example:
photograph a flower at f8 & 1/60, f11 & 1/25, and f5.6 and 1/125. All should have the same end result in exposure but will have differing depths of field and or motion/blur.
You will need to WRITE DOWN THE CAMERA SETTINGS YOU USE FOR EACH SHOT!!!! lastly make a document in NeoOffice with your 3 images and exposure values.
To adjust the shutter speed you will be using the thumb click wheel:
To adjust the aperture you will need to hold down the "AV" button while using the same click wheel:
Tips: try and repeat the same action (speed, focus etc).
You will be finding a different scene/object/subject. You will photograph this 3 times using a different combination of aperture and shutter settings.
example:
photograph a flower at f8 & 1/60, f11 & 1/25, and f5.6 and 1/125. All should have the same end result in exposure but will have differing depths of field and or motion/blur.
You will need to WRITE DOWN THE CAMERA SETTINGS YOU USE FOR EACH SHOT!!!! lastly make a document in NeoOffice with your 3 images and exposure values.
Friday, October 15, 2010
Roll #3
For this roll of film we will be taking images for the PTSA Reflections contest. The theme this year is “Together we can…”
This is the only rule for this roll of film, the rest is up to you. Though, I encourage you to consider your composition of each image:
This is the only rule for this roll of film, the rest is up to you. Though, I encourage you to consider your composition of each image:

Wednesday, October 13, 2010
Printing your landscapes
You must print:
- a contact sheet
- an image (your best)
- the same image printed using a variable contrast filter (higher #(2+) adds contrast, lower (2-)decreases contrast). If you negatives are dark use a low filter, if your negatives are thin/light use a high filter. If negs are normal try a #3.


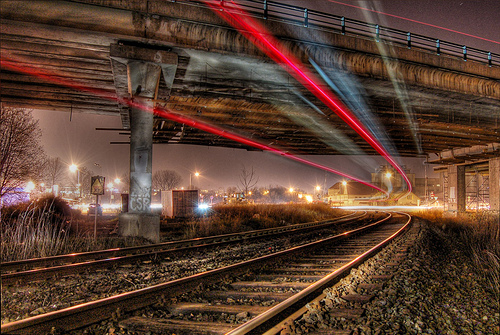
more on filters...


Filters add/limit contrast... higher numbers, more contrast, lower number limited contrast.


They increase contrast and can really make your pictures POP!
Variable Contrast Filters
Variable contrast filters are used to increase contrast in flat images.

Contrast filters are necessary for increasing or decreasing the amount of contrast in your print. If your test prints are coming out much too gray, then increasing the number of your filter will increase the contrast, making the whites whiter and the blacks blacker. Everyone has a different preference when it comes to deciding which contrast filter to start with, but I have always found for my purposes that a contrast filter of 3 suits me well when I’m working on a black and white enlarger.
Changing your contrast filter as you do test prints will also affect your exposure times, so don’t expect the same results in exposure when changing from a 3 to a 3 1/2 or a 4. You will need to make a new test strip!!!

The first photograph here shows the effect of a lower contrast filter. The second illustrates the effect of using a contrast filter higher in number.
Monday, October 11, 2010
Dodging and burning are terms used in photography for a technique used during the printing process to manipulate the exposure of a selected area(s) on a photographic print, deviating from the rest of the image's exposure. Dodging decreases the exposure for areas of the print that the photographer wishes to be lighter, while burning increases the exposure to areas of the print that should be darker.
Any material with varying degrees of opacity may be used, as preferred, to cover and/or obscure the desired area for burning or dodging. One may use a transparency with text, designs, patterns, a stencil, or a completely opaque material shaped according to the desired area of burning/dodging.
Ansel Adams elevated dodging and burning to an art form. Many of his famous prints were manipulated in the darkroom with these two techniques. Adams wrote a comprehensive book on this very topic called The Print.
ADVANCED DODGING AND BURNING:
http://www.photovisionmagazine.com/articles/fstopprinting.htm
Monday, October 4, 2010
Landscapes!!!
Ansel Easton Adams (February 20, 1902 – April 22, 1984) was an American photographer and environmentalist, best known for his black-and-white photographs of the American West, especially in Yosemite National Park. One of his most famous photographs was Moon and Half Dome, Yosemite National Park, California.
"When I'm ready to make a photograph, I think I quite obviously see sin my minds eye something that is not literally there, in the true meaning of the word. I'm interest in expressing something that is built from within, rather than just extracted from without."
"When I'm ready to make a photograph, I think I quite obviously see sin my minds eye something that is not literally there, in the true meaning of the word. I'm interest in expressing something that is built from within, rather than just extracted from without."
Friday, October 1, 2010
SCHEDULE
Your first photo assignment is due on Wednesday 10-6. You must turn in:
You should also plan to have finished shooting your next roll of film, landscapes, by Wednesday 10-6.
- contact sheet and test strip
- print and test strip
- exposure
- focus
- composition
- camera/darkroom technique
You should also plan to have finished shooting your next roll of film, landscapes, by Wednesday 10-6.
Subscribe to:
Posts (Atom)