Thursday, March 26, 2009

My America...

Ponder what the term America means to you, what emotions, thoughts, ideas, etc does it stir up? Take these and put them on film. For this assignment catch 'Your America' on your camera. Show what you like, hate, love, feel, and think about America. You need to shoot a minimum of 24 pictures by the end of the day Thursday April 9th that exemplify your America. Try and think outside of the box and be creative!!!


http://wwwdelivery.superstock.com/WI/223/1491/PreviewComp/SuperStock_1491R-159063.jpg http://i.pbase.com/g3/29/640429/2/57394221.SubwayRome.jpg http://www.surfingart.com.au/photo-shop/images/uploads/63busB&W.jpg


please visit this link and enter 3 words, themes, thoughts that pop into your head when you think of America...

Tuesday, March 17, 2009

ROLL #3... Depth of Field

For this roll of film the subject matter is rather wide open, but there are some restrictions. Using the compositional suggestions leaned in class (rule of 1/3, leading lines, framing, balance, etc) shoot a roll of film (24+ exposures) experimenting with depth of field. You should shoot 12ish pictures with an intentionally short depth of field and 12ish pictures with a wide depth of field. You roll should have numerous repeat images with varied depths of field... experiment, have fun, shoot still life, portraits, landscapes, but mix up the focus/depth.

Depth of Field Defined:

Depth of field is the range of distance within the subject that is acceptably sharp. The depth of field varies depending on camera type, aperture and focusing distance, although print size and viewing distance can influence our perception of it.


Depth of Field Example Image


Depth of Field

The depth of field does not abruptly change from sharp to unsharp, but instead occurs as a gradual transition. In fact, everything immediately in front of or in back of the focusing distance begins to lose sharpness-- even if this is not perceived by our eyes or by the resolution of the camera.


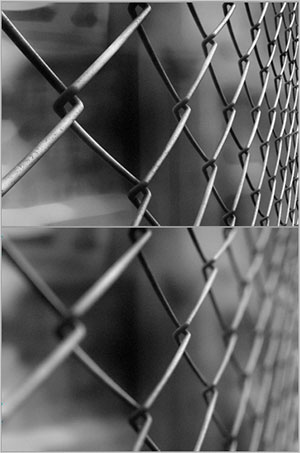
Aperture and focal distance are the two main factors that determine how big the circle of confusion will be on your camera's sensor. Larger apertures (smaller F-stop number) and closer focal distances produce a shallower depth of field. The following depth of field test was taken with the same focus distance and a 200 mm lens (320 mm field of view on a 35 mm camera), but with various apertures:


f/8.0f/5.6


F2.8


get it? got it? good...

http://farm4.static.flickr.com/3416/3224449962_791503d460.jpghttp://rookery2.viary.com/storagev12/1148000/1148371_66f9_625x1000.jpg


http://www.justinbumgardner.com/Biography_page/Index_page/Piano_key_black_and_white_op_.jpg

http://www.photoshopsupport.com/photoshop-blog/06/10/ib/depth-of-field-pro-3-2.jpg


http://wakeupandlive.files.wordpress.com/2008/10/dragonfly-macro-black-and-white.jpg


http://farm4.static.flickr.com/3444/3221478371_1d71dca419.jpg


Thursday, March 12, 2009

DARKROOM FILTERS...


Filters add/limit contrast... higher numbers, more contrast, lower number limited contrast.

Example:

Tuesday, March 10, 2009

Landscapes


make sure they all include for/mid/background...

Tuesday, March 3, 2009

BRING YOUR SUPPLIES TODAY

March 3rd.

Bring --
*paper
*film
*binder

remember you do not need ALL your film or ALL your paper, you can start with a "student pack" to get you rolling. but everyone needs a 3 ring binder to store negatives etc.

Landscapes

epic examples:
http://www.outdoor-photos.com/


Now that you know a little about how cameras work and composition, it is time for our first real shooting assignment!

LANDSCAPES!!!


The trick to landscapes is to show depth:

the secret to getting your images to show depth is to include for/middle/background all in the same image. Let it lead the viewer from something up close to things far away...

First Roll of Film Due Dates:

2/25 -- Film Processed
3/3 -- Contact Sheet
3/9 -- First Print (turn in image and contact sheet)

contact sheet example:

http://www.ephotozine.com/articles/Making-your-first-contact-sheet--traditional-darkroom-ideas-4652/images/contsheet1.jpg

Making a contact/proof sheet in the darkroom

1. You can have the safelight on when making a Black&White contact print, but not for a color contact print.
2. If you are using an enlarger, adjust the height of the enlarger so that the light will cover an entire sheet of paper.

Measure the height of the enlarger, on the column, and record this measurement in your notebook. You will want to make all future contact proof sheets with the same setting.

3. Place the paper on the easel, or on the baseboard, or on the countertop, depending on where your light source is located.
4. Put the negatives, emulsion side down, on the paper, the strips should not overlap, but be butted against each other.
5. Place a sheet of glass over the negatives, pressing them against the paper.
6. Expose the paper to light. you will need to make a test print.
7. Develop the print, when you have established the correct exposure, wash and dry the print.

When making your test print, instead of looking at the blacks in the pictures, look at the edges of the film, where the sprockets are. Establish an exposure / f-stop combination that is just enough to make the edges maximum black. The exposure strip that is just prior to this would show the edges as a little grayer than the holes in the sprockets.


How to make a test strip in the darkroom...

http://www.ehow.com/video_2372409_making-test-strip-darkroom.html