Wednesday, September 29, 2010

Place the negative to be enlarged in the negative carrier of the enlarger and with the enlarging lamp on, and the lens set at maximum aperture, adjust the height of the head so that the image fills the size of the paper you intend using. You will find it easier to do this if the normal light in the room is now turned off.


When you use a focus finder it magnifies the grain so it is easier to see when the image is sharp. You will see the grain structure when the image is perfectly focused.

Now you can make a TEST STRIP!!!


Tuesday, September 28, 2010

TURN IN YOUR FEE!!!

$20 fee is over due!!!

Materials fees were due by Friday September 24th. Turn your fee in to Ms. Denny's office to improve your grade, an east 25 pts.

grade will be updated online Thursday and reflect this fee/grade. If you need a scholarship please come and see me.

Monday, September 27, 2010

know the enlarger!


In addition to what is labeled on this diagram, know the location of the head, neck, and aperture on the enlarger! We will have a quiz on Friday.

Friday, September 24, 2010

Making a Contact Sheet

1. You can have the safelight on when making a Black&White contact print, but not for a color contact print.
2. If you are using an enlarger, adjust the height of the enlarger so that the light will cover an entire sheet of paper.
3. Place the paper on the easel, or on the baseboard, or on the countertop, depending on where your light source is located.
4. Put the negatives, emulsion side down, on the paper, the strips should not overlap, but be butted against each other.
5. Place a sheet of glass over the negatives, pressing them against the paper.
6. Expose the paper to light. you will need to. make a test strip to determine exposure time.
7. Develop the print, after you have established the correct exposure time, wash and dry the print.

When making your test print, instead of looking at the blacks in the pictures, look at the edges of the film, where the sprockets are. Establish an exposure / f-stop combination that is just enough to make the edges maximum black. The exposure strip that is just prior to this would show the edges as a little grayer than the holes in the sprockets.


Making a Test Strip:


http://www.ehow.com/how_14807_make-test-strip.html

Wednesday, September 22, 2010

landscapes! your second roll of film....

Landscapes!!!!


Landscape comprises the visible features of an area of land, including physical elements such as landforms, living elements of flora and fauna, abstract elements like lighting and weather conditions, and human elements like human activity and the built environment.

Please do not center the horizon line and try to show something in the foreground, mid-ground, and background.

The trick to landscapes is to show depth:

the secret to getting your images to show depth is to include for/middle/background all in the same image. Let it lead the viewer from something up close to things far away... similar to the leading lines we just shot.

epic examples:
http://www.outdoor-photos.com/

Developing film


Next you need the developer tank. The more common one is the AP. It's made entirely of plastic and is one of the easiest to load in the film.

You will need the measuring cylinger & a thermometer.

A stop watch is a must.

Invest in a changing back. Do not think that your store room is dark enough.

Step 2 - Load Film

Now you have the tools, it's time to start work!

When rewinding an exposed roll of film, leave the end behind so that you can pull out the film from the canister easily.

This step is supposed to be done in total darkness or in a dark bag. Do not expose undeveloped film to any form of light. Your entire roll of film will be void.

Remember: DO NOT ATTEMPT THIS STEP IN BROAD DAYLIGHT !

Now you can load the film into the developer tank. You will need to do this in the dark bag! Do not pull out the film and expose to light. All the shots that you have taken will be exposed & void!

If the entire roll is reeled back into the film canister, you will need to open up the film canister using a bottle opener or use a film picker to retrieve the end of the negatives.


This is the most crucial part of the developing process.

Reel in the film into the white reel. You will need to practise this procedure in the light first. Practise with a void exposed negatives and make sure you are confident in doing it in the dark.

Practise reeling in with your eyes blindfold or in total darkness.

I personally find that it's easier to pull out the entire roll of negatives in the dark bag first and reel the end portion into the reel.


The negatives are rolled in with the help of two small ball bearing roller on the reel.

Ensure the reel is DRY before reeling in the negatives. Wet reels cause the ball bearing to loose friction and unable to reel the negatives proper;y. You may damage or bent your negatives if the reel gets stuck.

Apply consistent pressure and make sure the negatives do not get stuck and bent.

In "rocking motion" reel in the entire roll.

Practice make Perfect.

Viola!

Now you can load the reel into the developer tank.

Once the reel is in the developer tank, screw in the top cover. The rest of the procedure can be perform in the light.

The tank is designed to be light tight. So, do not be afraid the film might get exposed from this point forward.

Step 3 - The Developing

Preparing the developer solution.

Follow the dilution instuction on the film. If you could not find the dilution instruction, check out this web site:
http://www.digitaltruth.com/devchart.html

for development timing with respective solution.


Pour the solution into the developing tank. Shake the tank for 10sec for every minute of soaking.

Shake well in a rocking motion for 10sec.

Dislodge the bubbles after shaking by hitting the bottom of the developing tank lightly on a piece of cloth.

Reason for doing so is to dislodge, clear the bubbles from the reel that was built up during shaking.

Failure to do so might end up with white spots on the negatives.

You do not need to follow the time up to the last second. Give and take 15~20sec should not get noticable difference on your negatives.

To "push" the film, simply develop slightly longer (about 1 to 2 min) to get the film exposed to the developer longer.

You can store the developer working solution for future use.

Remember, this is done at your own risk! If you want to save on the developer, the working developer solution can be used up to 3 to 4 times in a month with no noticable degradation. However, extend the developing time by 30s for each cycle as the solution might get more diluted after a few wash.

I would suggest to dispose the working solution after 3 to 4 use or after 1 month.


After pouring out the developer working solution, you will need to wash away any developer residue on the negatives surface.

You can either use the stop bath or flush the developer tank with plenty of water.

In this part of the world (Singapore) water is precious. So usually, I will recycle the water to flush my toilet.

Rinse up to 4 to 5 times to ensure the developer is thoroughly washed off. If possible, shake the tank to make sure the negatives are thoroughly rinsed..

Step 4 - The Fixer

Next, prepare the fixer. Follow the instuctions on the fixer and perpare the fixer working solution.

Pour the fixer into the developing tank and do the same as the developing process, for every minute of soaking, shake the tank for 10sec and dislodge the bubbles by hitting on the surface of the table lightly.

You can recycle the fixer solution too. I personally recycle the fixer for up to 4 to 5 times or up to 2 months when stored in a cool dry place.

I am not suggesting you to be as frugal as me, but if you shoot a lot of film, this is one way that can help to bring cost down.
  Store the developer in a container and REMEMBER to label it. Keep the solution in a cool place away from pets and children. Do NOT mix with drinks or your favourite alcohol beverage.

Step 5 - Final Rinse

From this stage, you can open up the developing tank and expose the negatives to light.

Rinse the negatives in running water. Some of the negatives (Kodak Tri-X & T-Max) have a purple tint on the surface and is only washed off with lots of water rinsing and soaking (in clean tap water).


Rinse & Soak the negatives in clean tap water for at least 15min to rid of any developer or fixer residue.

To save environment, recycle that water to flush or wash the toilet.

Rinse very very well.

Step 6 - (Final Step) Drying

Now, this is the second most crucial part (after loading)... Drying.

Shake off excess water from the reel. Shake hard so that you get as much excess water off the negatives as possible.

I do not suggest to wipe or use any tools to dry the negatives, as direct contact to the negatives will most probably scratch the surface. Even using fingers running through the negatives will scratch the surface with the dead skin bits on the fingers.

I would suggest the best possible method is shake off excess water & hang dry the negatives naturally.

Always dry the negatives in a cool and dry room, preferably in an air-con room. Do not blow the negatives with hair dryer and fan as they will surely leave lots of dust particle mark on your negatives.


Dry in a cool area for about 1~2 hours. Only when the negatives are totally dry, then you can cut them up to store or scan them.

Storing a partially dried negatives will cause the negatives to stick onto surfaces and damage the negatives.

Hang some weight at the bottom of the negative to straighten the negatives while drying. This ensure the negatives are dry evenly.

Nothing beats the excitement of seeing the images crystalising in front of you...

You may scan or print the negatives in dark room when the negatives are fully dried.

Monday, September 20, 2010

DUE WEDNESDAY

  • NOTES ON COMPOSITION FROM CLASS
  • CAMERA DRAWING
bring these to class to be checked off!
Class work and homework
This is not a writing intensive course, but there is some reading the first couple weeks of class.
Please take notes on the bold faced words as you read from the links below. You will be shooting the various composition elements this weekend and next week. We will also have a quiz on this material as well.

monday's Reading (homework if not completed in class):

Two links about composition:http://www.picturecorrect.com/tips/photography-the-rules-of-composition/

Friday, September 17, 2010

BEFORE YOU CAN CHECK OUT TO SHOOT...


Be sure you have loaded your film correctly!!! Double, no triple, check it. Can you turn the rewind knob? does it rotate when you advance your film? Make sure!!!


Also, do you understand your light meter? It may differ from those in the Nikon D40's, how does yours work? You will need to consult it each time you take a picture!

Wednesday, September 15, 2010

Camera Help?


Need a battery, repair, or to buy a used camera? This is a great local resource!

Camera Clinic

(206) 367-2440
518 NE 165th St
Shoreline, WA 98155

Staff Server


this is where we turn everything in....

http://docs.google.com/viewer?a=v&q=cache:tJ8ZHmxctyYJ:learn.shorelineschools.org/shorecrest/laptop/documents/p4_organization-server-naming.pdf+staff+server&hl=en&gl=us&pid=bl&srcid=ADGEESjqLBsoV9i68csgpELLyjhm5xmwaUt9S_Du_3DYhBiDeqqXV99q5Wj2GyghyIWAwxpCBgK4Pl6UFcZVPlBbWMXnv4kGo341yR6kwhc1iNjyYN0gW2Mx5X2nBf3WBzHi6bpWeaim&sig=AHIEtbQDxQPD3ds0XmjvR5iX9lwcg47e5A

FIRST SHOOTING ASSIGNMENT!!!

Due Monday September 20TH.

Your task is to shoot your first roll of film Friday and over the weekend. The subject matter is entirely wide open, shoot whatever interests you. There are a few requirements though. All of your images MUST:
  • follow the rule of 1/3
  • be shot from unique angles/perspectives
  • be creative & interesting
  • NOT shot standing up 5'8" looking straight at something
Have fun with this, try and be inventive, when you are shooting, think to yourself "will this be an interesting image? would I want to hang this on my wall?"

Contact Sheets!


How to make a contact sheet...

In Photoshop CS3:

* Create a new folder on your desktop with your pictures.
* Open Photoshop CS3.
* Select File>Automate>Contact Sheet II
* Select on Folder and choose the folder your created.
* Make sure the image size is 8*10 inches.
* The resolution should be 300.
* Columns=4 and rows=5.
* Click OK.
* File>Save as a jpeg

How to load film

Friday, September 10, 2010

http://staff.drewloker.com/k1000parts.htm

camera drawing...

In an attempt to get to know your camera we are going to sketch it out and label the parts.

Be sure your camera drawing has the following parts. This will be due on Tuesday 9/14.

• Aperture
o Where/How to adjust
o List the F-stops on your camera (1.8, 2.0, 4, 5.6, etc)

• Shutter Speeds
o How to adjust
o List the speeds on your camera (1000,500,250 etc)

• Film Speed (ISO or ASA) and set it to 400 - it will live at 400 all year.
• Rewind (and rewind release, often a button on the bottom or on the front labeled with "R")
• Shutter release - button to take pics
• Lens
• How to open the back of your camera
• Viewfinder - what you look through
• Light Meter (and how does it adjust)
• Film advance - to move to the next frame, some are automatic
• Power (on/off and manual mode if your camera has options)

light meter, it lives in your camera...

You MUST be sure you adjust your aperture and shutter for EVERY image. Consult your light meter for every shot and be sure it informs you there is enough light. Light meters differ for each camera, know yours! Here is an example, adjust the aperture, shutter, and ISO to see the results on the image exposure.

more on shutter and aperture

The aperture controls the amount of light allowed into your camera...


The shutter controls how long this light is allowed in...


These two factors work together to create images that are properly exposed.

more info:

Aperture
The aperture is the size of the lens opening. It controls the amount of light let in: a larger aperture lets in more light, while a smaller aperture lets in less light.


An aperture is made out of aperture blades (usually five to nine) that form a rough circle to control the size of the opening, and therefore the amount of light let in. The size of the opening is that f/number that I described earlier. Basically, that f/number is a ratio of focal length to aperture diameter. Do you need to know this? Not really, except you should keep in mind that the aperture is a ratio.

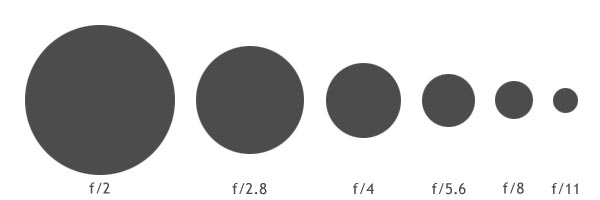
Simply put, the smaller the f/number, the larger the opening (f/3.5 = 1/3.5 = 0.286; f/16 = 1/16 = 0.0625). That's all I'm going to explain here because it's an extremely complicated topic and you don't really need to know it. There's plenty of places on the web that explain it in great scientific detail; this is not one of them. The following is a diagram of f-stops. Each f-stop (or just a stop) lets in half the amount of light of the previous f-stop.


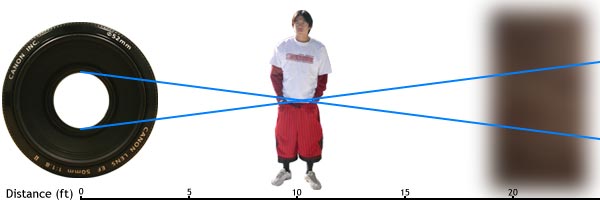
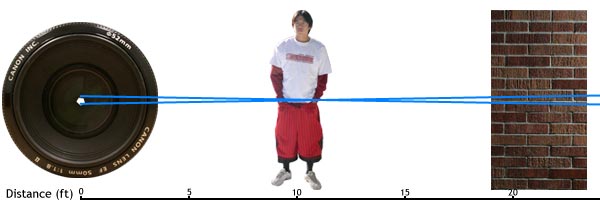
Now, lets get on to why this matters and how it can change what your picture looks like. Basically, a larger aperture (lower f/number) will have your subject in focus, and everything in front of and behind it blurry. A smaller aperture will have your subject in focus and everything in front of and behind it quite focused as well. Take a look at the following diagram; the further apart the lines are, the more out of focus something is:


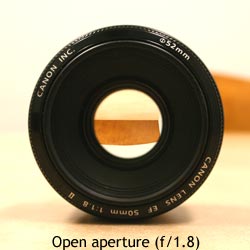
Large aperture (f/1.8).

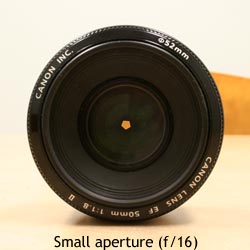
Small aperture (f/16).


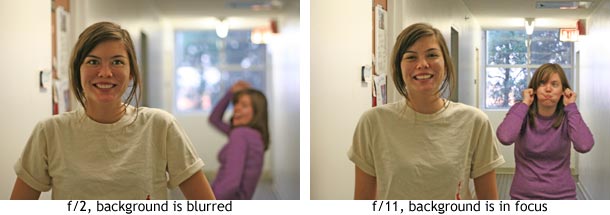
Summary: Large aperture, background out of focus; small aperture, everything in focus. (Large aperture = smaller f-number, small aperture = larger f-number).


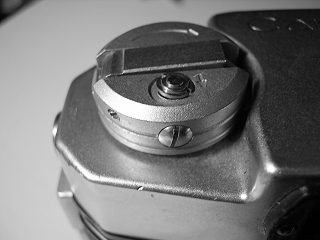
Shutter Speed
Shutter speed is a much simpler concept to understand. It's basically how long the sensor/film in the camera is exposed to light. How long the shutter stays open depends on how much light there is. 
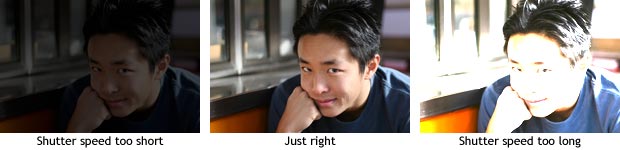
For pictures with the same aperture setting, if the is shutter open too long, the picture will be too bright, and if it's not open long enough, the scene will be too dark. Therefore, you control the overall exposure (lightness and darkness) of the scene with both the aperture and shutter speed control.


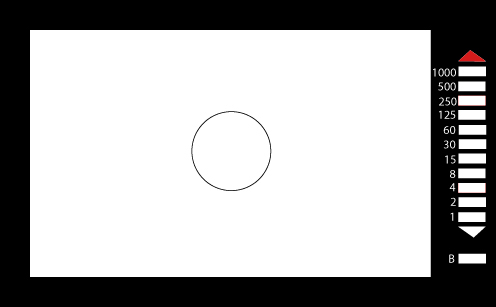
Your camera judges this for you, but you can manually set it as well. The shutter speed is the other (usually larger) number that isn't the aperture value. This number is actually a fraction, so if you see a shutter speed of 4000, it's actually 1/4000th of a second, while a value of 200 is 1/200th of a second. Now, remember how I mentioned stops in the aperture section? Well, they also apply to shutter speed, but in a slightly different way. By halving the time of exposure, you're letting in half the amount of light (so if you go from 1/2000 sec to 1/4000 sec, then you're letting in half the light). The opposite is true for doubling the exposure time.

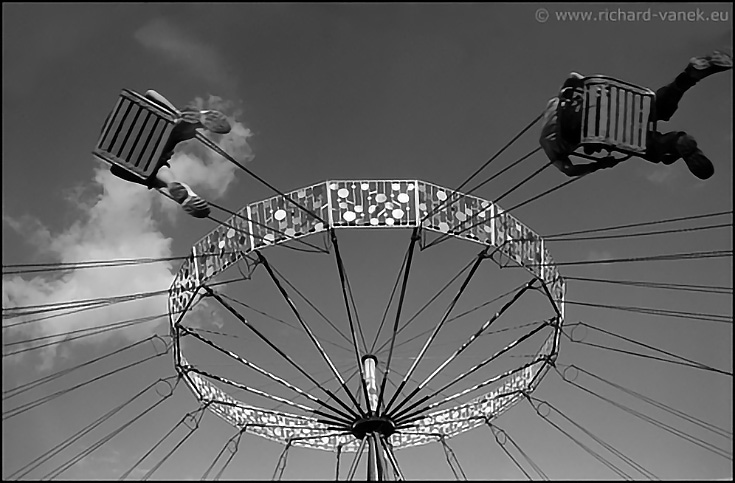
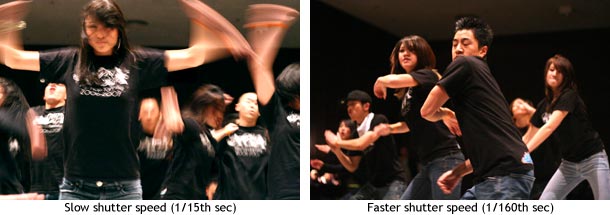
What you can do with shutter speed is freeze motion with a fast shutter speed or capture movement with a slow shutter speed. Flowing water looks silky smooth at speeds slower than 1/8th of a second (with a tripod), while you can freeze water in time with fast shutter speeds. The same thing goes for hip hop dancers.


Also, an important side note is that there is a rule for getting sharp images: 1/focal length. So if you have a 50mm lens then you'd need at least 1/50th of a second for your picture to not be blurry, and if you're using a digital SLR then there is a crop value (minus a few exceptions) of 1.5/1.6 so your 50mm lens is a 75~80mm lens, which means that you need a shutter speed of at least 1/80th of a second to get a sharp image.

Summary: Fast shutter speed = freeze action. Slow shutter speed (w/ tripod) = silky flowing water.


How Aperture and Shutter Speed are Related
Aperture and shutter speed are bound together like an old married couple. For the same scene, if you open the aperture, you increase the shutter speed, and if you close down the aperture, you decrease the shutter speed. Think of a bucket of water with a hole in the bottom. If you have a large hole in the bottom of the bucket (large aperture), water will drain out quickly (fast shutter speed). Conversely, for the same amount of water, if you have a small hole in the bottom of the bucket (small aperture), the water will drain out slowly (slow shutter speed).


Remember how I mentioned stops earlier? Well one aperture stop is equivalent to one shutter speed stop, therefore if you open up your aperture one stop brighter (say from f/8 to f/5.6), and increased your shutter speed to one stop darker (like 1/250 to 1/500), then you would get the same exposure. So f/8 @ 1/250 is equivalent to f/5.6 at 1/500. This is the theory of equivalent exposures.

Summary: Larger aperture, faster shutter speed; smaller aperture, slower shutter speed. Increase aperture by one stop and decrease shutter speed by one stop = equivalent exposure (and vice versa).


There are a lot of uses for aperture and shutter speed. One of which is of course the background blur that everyone always wants to know how to get. Another thing you can do with a slow shutter speed is a night shot, which can give very interesting results. Check them out.