Wednesday, September 30, 2009

Landscape Task...


Shoot one roll of landscapes (24+ images) from 4+ different locations. Every image should follow the rule of 1/3 and should include for/mid/background.

Landscapes!!!!


Landscape comprises the visible features of an area of land, including physical elements such as landforms, living elements of flora and fauna, abstract elements like lighting and weather conditions, and human elements like human activity and the built environment.

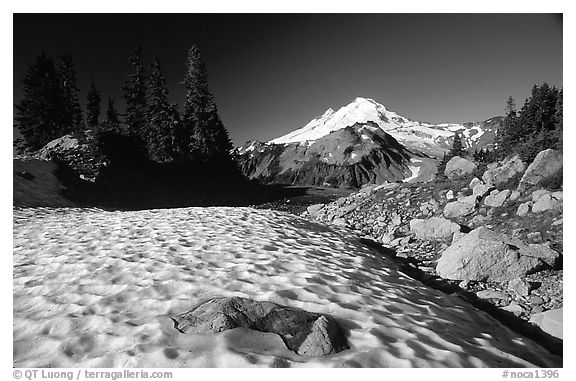
Please do not center the horizon line and try to show something in the foreground, mid-ground, and background.

The trick to landscapes is to show depth:

the secret to getting your images to show depth is to include for/middle/background all in the same image. Let it lead the viewer from something up close to things far away... similar to the leading lines we just shot.

epic examples:
http://www.outdoor-photos.com/

Sunday, September 27, 2009

COMPOSITION!!!


 please read the following 3 web articles...  take notes!  We will be using these techniques starting Tuesday!
  http://www.microsoft.com/windowsxp/using/digitalphotography/learnmore/composition.mspx

http://knol.google.com/k/yanik-chauvin/photography-composition-an-introduction/2rcdarvscszjb/2#

http://www.amateursnapper.com/photography/10-top-photography-composition-rules

TAKE NOTES! you need to have notes which include definitions for the following:
  • leading lines
  • frame withing a frame
  • balance
  • perspective/viewpoint
  • cropping
  • background
  • depth
  • Symmetry & patterns
  • rule of thirds (you should know this by now!)
(notes will be checked at the start of class on Tuesday)
Your task (and/or homework):

Find an image online demonstrating leading lines, frame withing a frame, balance, & perspective/viewpoint. Include the web address of these images in your notes, or save them in a textedit document if your notes are hand written.


Thursday, September 24, 2009

making a contact/proof sheet...

  1. You can have the safelight on when making a Black&White contact print
  2. using an enlarger, adjust the height of the enlarger so that the light will cover an entire sheet of paper (all of your negatives).
  3. Place the paper on the countertop, depending on where your light source is located.
  4. Put the negatives, emulsion side down, on the paper, the strips should not overlap, but be butted against each other in your clearfile.
  5. Place a sheet of glass over the negatives, pressing them against the paper.
  6. Expose the paper to light. You will need to make a test strip to know how much light is required (see post below for directions and example).
  7. Develop the print, when it you have established the correct exposure, wash and dry the print.

Wednesday, September 23, 2009

Making a contact sheet


cut your negatives up and place them into a clearfile. You will use this to make a contact sheet.

place your paper under your negatives. place your negs on top and a plate of glass atop that. The follow the test strip instructions below to determine the exposure time for your paper/negs.

How to make a test strip in the darkroom


http://www.ehow.com/how_14807_make-test-strip.html

Steps for processing film:

PROCESSING FILM –

1) Get a reel, canister, lid and funnel and head into the darkroom to load your film onto the reel

2) Fill your canister with the developer (brown jug) for the desired amount of time (agitating for the first minute and 10 seconds every additional minute).

3) Pour the developer out INTO THE SINK.

4) Rinse with water from the purified hose for 1 minute (fill 5 times).

5) Fill with Fix (Large white bucket with spout) and agitate for the entire 6-7 minutes while fixing.

6) Pour the Fix BACK INTO THE FIX BUCKET.

7) Rinse canister with water again.

8) Open canister and put film into wash tube for 5 – 10 minutes.

9) Wash out your canister and return to blue bins. Do not leave your canister/reel in the sink!

10) Run film through PhotoFlo and hang to dry with a clip on the top and bottom.

11) Cut into strips and place into a clearfile and place it in your 3 ring binder.


*** remember not to touch your film, only touch the edges, not the negatives!***

Monday, September 21, 2009

PROCESSING FILM...


Today, Monday, we will be processing the film you shot over the weekend. To start be sure you have all your supplies:
  1. canister
  2. funnel
  3. reel
  4. cap
  5. agitator
  6. lid


for more info on how to process click here

Friday, September 18, 2009

before you can check out...

you must have turned in the following:

  • photogram
  • camera drawing
  • academic plan
  • checkout form (to leave campus)

First shooting assignment

Due Monday September 21st.

Your task is to shoot your first roll of film Friday and over the weekend. The subject matter is entirely wide open, shoot whatever interests you. There are a few requirements though. All of your images MUST:
  • follow the rule of 1/3
  • be shot from unique angles/perspectives
  • be creative & interesting
  • NOT shot standing up 5'8" looking straight at something
Have fun with this, try and be inventive, when you are shooting, think to yourself "will this be an interesting image? would I want to hang this on my wall?"

Parts of the camera

Be sure your camera drawing has the following parts. Due BEFORE you can shoot on Friday.

• Aperture
o Where/How to adjust
o List the F-stops on your camera (1.8, 2.0, 4, 5.6, etc)

• Shutter Speeds
o How to adjust
o List the speeds on your camera (1000,500,250 etc)

• Film Speed (ISO or ASA) and set it to 400
• Rewind (and rewind release, often a button on the bottom)
• Shutter release
• Lens
• How to open the back of your camera
• Viewfinder
• Light Meter (and how does it adjust)
• Film advance
• Power (on/off and manual mode if your camera has options)

WHEN FINISHED DRAWING WE WILL LOAD FILM INTO YOUR CAMERA… WE ARE SHOOTING ON FRIDAY.

Thursday, September 17, 2009

SHOOTING!!!

It is finally time to take pictures! Once your camera is loaded with film (see video post below) it is time to take pictures. You MUST be sure you adjust your aperture and shutter for EVERY image. Consult your light meter for every shot and be sure it informs you there is enough light. Light meters differ for each camera, know yours! Here is an example, adjust the aperture, shutter, and ISO to see the results on the image exposure.

Photogram!


Due Wednesday 9-16... turn in your best photogram. Remember, no pocket photograms!!!!

How to load film in your camera...

Wednesday, September 9, 2009

Photoshop...

How to make a contact sheet...

In Photoshop CS3:

* Create a new folder on your desktop with your pictures.
* Open Photoshop CS3.
* Select File>Automate>Contact Sheet II
* Select on Folder and choose the folder your created.
* Make sure the image size is 8*10 inches.
* The resolution should be 300.
* Columns=4 and rows=5.
* Click OK.
* File>Save as a jpeg

Tuesday, September 8, 2009

Academic Plan and Check out form...

due on Wednesday Sept. 16th

bring your OWN CAMERA on Friday...

Try and bring in whatever kind of film, 35mm camera you can find, borrow, use, buy, loan, etc on or before Friday of this week. If you have yet to acquire some form of a camera come and see me at TAP.

Shutter Speed & Aperture...

The aperture controls the amount of light allowed into your camera...


The shutter controls how long this light is allowed in...


These two factors work together to create images that are properly exposed.

more info:

Aperture
The aperture is the size of the lens opening. It controls the amount of light let in: a larger aperture lets in more light, while a smaller aperture lets in less light.
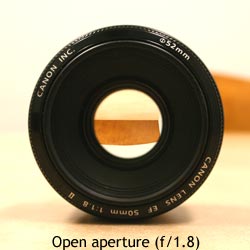
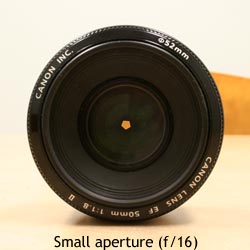
An aperture is made out of aperture blades (usually five to nine) that form a rough circle to control the size of the opening, and therefore the amount of light let in. The size of the opening is that f/number that I described earlier. Basically, that f/number is a ratio of focal length to aperture diameter. Do you need to know this? Not really, except you should keep in mind that the aperture is a ratio.

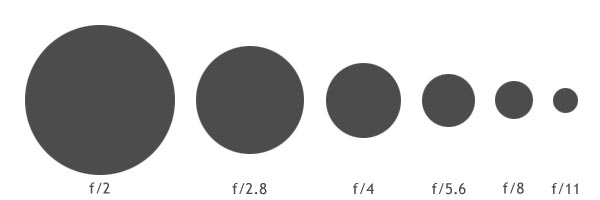
Simply put, the smaller the f/number, the larger the opening (f/3.5 = 1/3.5 = 0.286; f/16 = 1/16 = 0.0625). That's all I'm going to explain here because it's an extremely complicated topic and you don't really need to know it. There's plenty of places on the web that explain it in great scientific detail; this is not one of them. The following is a diagram of f-stops. Each f-stop (or just a stop) lets in half the amount of light of the previous f-stop.

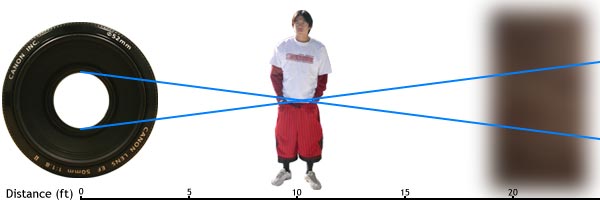
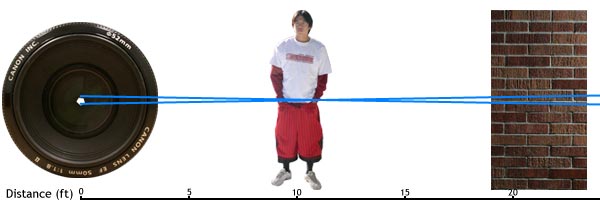
Now, lets get on to why this matters and how it can change what your picture looks like. Basically, a larger aperture (lower f/number) will have your subject in focus, and everything in front of and behind it blurry. A smaller aperture will have your subject in focus and everything in front of and behind it quite focused as well. Take a look at the following diagram; the further apart the lines are, the more out of focus something is:


Large aperture (f/1.8).

Small aperture (f/16).
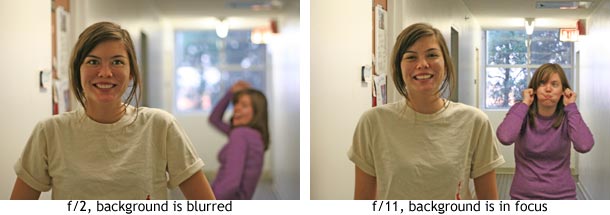

Summary: Large aperture, background out of focus; small aperture, everything in focus. (Large aperture = smaller f-number, small aperture = larger f-number).


Shutter Speed
Shutter speed is a much simpler concept to understand. It's basically how long the sensor/film in the camera is exposed to light. How long the shutter stays open depends on how much light there is. For pictures with the same aperture setting, if the is shutter open too long, the picture will be too bright, and if it's not open long enough, the scene will be too dark. Therefore, you control the overall exposure (lightness and darkness) of the scene with both the aperture and shutter speed control.


Your camera judges this for you, but you can manually set it as well. The shutter speed is the other (usually larger) number that isn't the aperture value. This number is actually a fraction, so if you see a shutter speed of 4000, it's actually 1/4000th of a second, while a value of 200 is 1/200th of a second. Now, remember how I mentioned stops in the aperture section? Well, they also apply to shutter speed, but in a slightly different way. By halving the time of exposure, you're letting in half the amount of light (so if you go from 1/2000 sec to 1/4000 sec, then you're letting in half the light). The opposite is true for doubling the exposure time.

What you can do with shutter speed is freeze motion with a fast shutter speed or capture movement with a slow shutter speed. Flowing water looks silky smooth at speeds slower than 1/8th of a second (with a tripod), while you can freeze water in time with fast shutter speeds. The same thing goes for hip hop dancers.
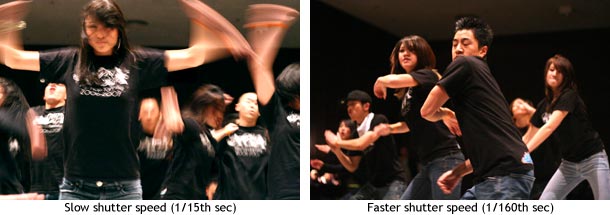

Also, an important side note is that there is a rule for getting sharp images: 1/focal length. So if you have a 50mm lens then you'd need at least 1/50th of a second for your picture to not be blurry, and if you're using a digital SLR then there is a crop value (minus a few exceptions) of 1.5/1.6 so your 50mm lens is a 75~80mm lens, which means that you need a shutter speed of at least 1/80th of a second to get a sharp image.

Summary: Fast shutter speed = freeze action. Slow shutter speed (w/ tripod) = silky flowing water.


How Aperture and Shutter Speed are Related
Aperture and shutter speed are bound together like an old married couple. For the same scene, if you open the aperture, you increase the shutter speed, and if you close down the aperture, you decrease the shutter speed. Think of a bucket of water with a hole in the bottom. If you have a large hole in the bottom of the bucket (large aperture), water will drain out quickly (fast shutter speed). Conversely, for the same amount of water, if you have a small hole in the bottom of the bucket (small aperture), the water will drain out slowly (slow shutter speed).
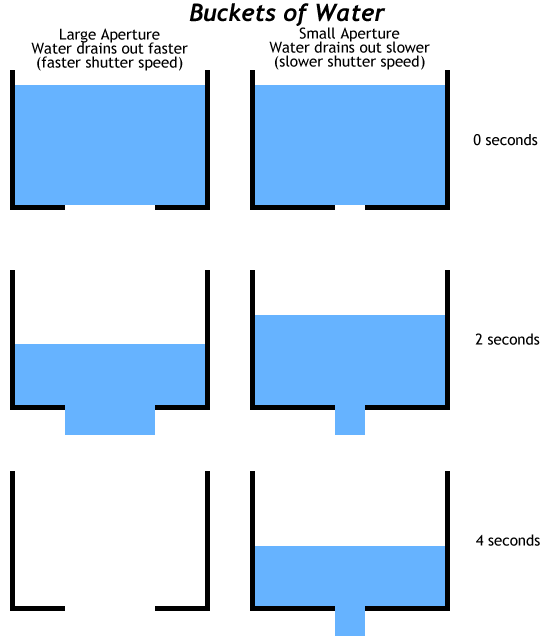

Remember how I mentioned stops earlier? Well one aperture stop is equivalent to one shutter speed stop, therefore if you open up your aperture one stop brighter (say from f/8 to f/5.6), and increased your shutter speed to one stop darker (like 1/250 to 1/500), then you would get the same exposure. So f/8 @ 1/250 is equivalent to f/5.6 at 1/500. This is the theory of equivalent exposures.

Summary: Larger aperture, faster shutter speed; smaller aperture, slower shutter speed. Increase aperture by one stop and decrease shutter speed by one stop = equivalent exposure (and vice versa).


There are a lot of uses for aperture and shutter speed. One of which is of course the background blur that everyone always wants to know how to get. Another thing you can do with a slow shutter speed is a night shot, which can give very interesting results. Check them out.
COMPOSITION... tips part #1

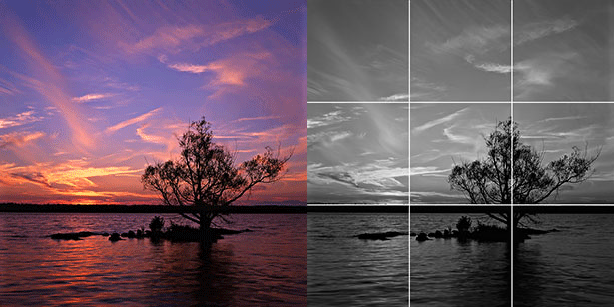
  1. The rule of thirds: an image can be divided into nine equal parts by two equally-spaced horizontal lines and two equally-spaced vertical lines. The four points formed by the intersections of these lines can be used to align features in the image. aligning a photograph with these points creates more tension, energy and interest in the photo than simply centering the feature would.
    This photograph of a sunset taken in the Thousand Islands region demonstrates the principles of the rule of thirds
    This photograph of a sunset taken in the Thousand Islands region demonstrates the principles of the rule of thirds
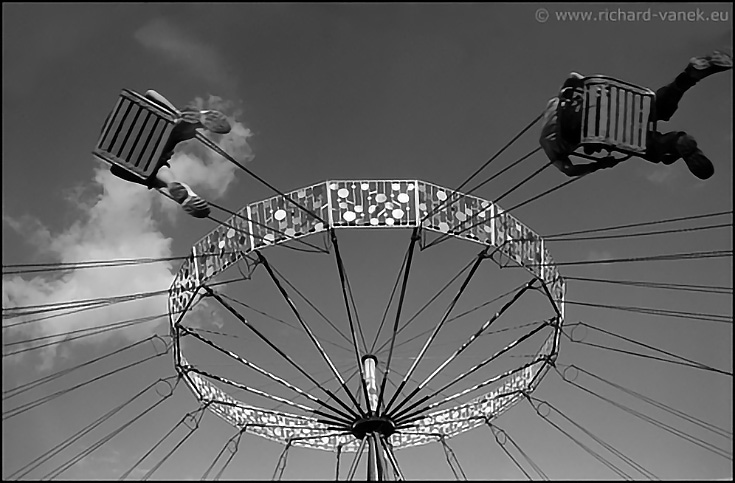
  2. Shooting from unique angles: none of your images should ever be taken from 5'8" - 6'2". That is, squat down, stand on top of something, crouch behind something, move around to find a different and unique perspective at your subject. Anyone can stand there and take a snap shot, show us your perspective by thinking outside of that box.

Tuesday, September 1, 2009

Welcome...


This is the site we will use for project and assignment details throughout the semester. For this class you are going to need film, photo paper, and a 35mm SLR camera (more info on that to come).